
Introduction#
Next.JS is a server-side rendering framework for React that allows you to build a complete, full-stack application with React and Server component. GatsbyJS first started as a static site generator but has evolved into a full-fledged framework for building web applications with React. Specific to blogs, both are trusted and used by many React developers to build their personal blogs.
Since both frameworks are built on top of React, they share a huge ecosystem of libraries and tools that help you build your React apps, from styling, state management, UI blocks to testing. However, NextJS focuses on server-side rendering, which means you can use native NodeJS APIs and libraries to fetch data and render your posts. GatsbyJS, on the other hand, uses GraphQL and its plugin system to achieve the same thing. Based on those differences, this article will help you decide which one is the best fit for your needs.
Criteria#
To compare NextJS and GatsbyJS, we will use the following criteria:
- Setup: How easy it is to set up a new project with both frameworks.
- TypeScript-friendly: How easy it is to use TypeScript with both frameworks.
- UI and styling: How easy both frameworks integrate with major UI tools such as TailwindCSS and ShadCN.
- Post rendering: How both frameworks fetch data and render posts using MDX.
- Server-side features (minimal): How both frameworks support server-side features such as query strings, and pagination.
- SEO: How SEO is supported in both frameworks.
- Third-party integration How well both frameworks support and integrate with other plugins, libraries, and tools.
- Customization: How you can deeply interfere and customize the behavior of both frameworks, such as dark mode, adding scripts, dynamic page generating, custom components in MDX files.
What we don’t cover in this article:
- Performance: We are targeting blogs, which are mostly static content. Performance is not a big concern here.
- Testing: While testing is important, it is beyond the scope of this article. Who tests their personal blog anyway?
- Databases and APIs: We are focusing on static sites with MDX files. Everything must be generated at build time, so there will no APIs or database involved during runtime.
Layout of the applications#
To keep it simple, each project will have the following layout:
/: Home page with a list of posts./posts/:slug: Post page with the content of the post./about: About page with some information about the author.
Each post will be written in MDX format and will have the following frontmatter:
--- title: string slug: string date: string published: boolean publishedAt: string author: string tags: string[] category: string thumbnail: string ---
Server components#
A major feature in NextJS is the ability to use React Server Components by default. In a nutshell, server components are rendered on the server ahead of time, before bundling, in an environment separate from your client app or SSR server1.
While NextJS has an amazing support for server components, GatsbyJS does not
fully support server components yet. First, the feature is still beta and not
recommended for production. Second, RSC does not work in gatsby develop
environment, which is a major drawback for developers who want to use it2.
More discussion in this RFC.
While server components are a great feature that reduces the complexity of data fetching and rendering, it is not a must-have feature for a blog since the majority of the content is static and can be pre-rendered at build time from MDX files. Therefore, I will not consider this feature in our comparison.
Setup#
Both frameworks provide a CLI tool to create a new project with a step-by-step configuration so you can tailor your project to your needs.
NextJS#
In NextJS, you can create a new project with create-next-app:
including
$ npx create-next-app@latest next-mdx-blog-template Need to install the following packages: create-next-app@15.1.6 Ok to proceed? (y) y ✔ Would you like to use TypeScript? … No / Yes ✔ Would you like to use ESLint? … No / Yes ✔ Would you like to use Tailwind CSS? … No / Yes ✔ Would you like your code inside a `src/` directory? … No / Yes ✔ Would you like to use App Router? (recommended) … No / Yes ✔ Would you like to use Turbopack for `next dev`? … No / Yes ✔ Would you like to customize the import alias (`@/*` by default)? … No / Yes ✔ What import alias would you like configured? … @/* Creating a new Next.js app in ~/next-mdx-blog-template. ...
NextJS CLI also allows you to choose an existing template to start. Those templates varies from a simple blog with small features such as TypeScript support to a full-fledged e-commerce site with a CMS integration. To clone a template, you can use the following command:
npx create-next-app --example with-cloudinary with-cloudinary-app
More templates can be found at NextJS starter templates and themes.
GatsbyJS#
In GatsbyJS you can create a new project with create-gatsby:
$ npm init gatsby > npx > create-gatsby create-gatsby version 3.14.0 Welcome to Gatsby! This command will generate a new Gatsby site for you in ~ with the setup you select. Let's answer some questions: What would you like to call your site? ✔ · gatsby-mdx-blog-template What would you like to name the folder where your site will be created? ✔ ~/ gatsby-mdx-blog-template ✔ Will you be using JavaScript or TypeScript? · TypeScript ✔ Will you be using a CMS? · No (or I'll add it later) ✔ Would you like to install a styling system? · Tailwind CSS ✔ Would you like to install additional features with other plugins? · Add responsive images · Add an automatic sitemap · Generate a manifest file · Add Markdown and MDX support Thanks! Here's what we'll now do: 🛠 Create a new Gatsby site in the folder gatsby-mdx-blog-template 🎨 Get you set up to use Tailwind CSS for styling your site 🔌 Install gatsby-plugin-image, gatsby-plugin-sitemap, gatsby-plugin-manifest, gatsby-plugin-mdx ✔ Shall we do this? (Y/n) · Yes ...
Like NextJS, GatsbyJS also has a list of starters and templates, developed by either the Gatsby Team or the community. They also varies from a simple page with small features to a full-stack. production-ready website. To clone a starter, you can use the following command:
npx gatsby new gatsby-starter-shopify https://github.com/gatsbyjs/gatsby-starter-shopify
More starters can be found on Gatsby starter library
Conclusion#
Both frameworks provide a great CLI tool to create or clone new projects that are tailored to your need. Both CLI tools offer a command-line prompt to help developers choose the right setup for their projects. For this criteria, both frameworks are equal.
TypeScript-friendly#
TypeScript is a big consideration when it comes to choosing which one to build your blog. At the core, TypeScript provides a type-checking system that prevents a majority of type errors from happening at runtime. From developer’s perspective, it also provides a better intellisense and code completion when using a modern IDE, or a language server. So how easy it is to use and integrate TypeScript in both frameworks should be weighed carefully.
NextJS#
Since both frameworks are built on top of React, writing React components and
logic code in TypeScript is easy and straight forward, with the help of the
@types/react, @types/react-dom packages and each framework’s CLI tools.
However, the tricky parts are those configuration and plugin code that is deeply rooted in each framework.
For example, in NextJS, generating metadata for SEO or a sitemap requires you to define a custom object, or pages might have some props such as params and search queries. Luckily, NextJS has a great support for TypeScript for those specific types:
import type { Metadata } from 'next' export const metadata: Metadata = { title: '...', description: '...', } export default async function Page({ params, }: { params: Promise<{ slug: string }> }) { const slug = (await params).slug }
GatsbyJS#
However, it’s a lot more complex in GatsbyJS.
First, GatsbyJS has its own API files gatsby-node, gatsby-config,
gatsby-ssr and gatsby-browser to control the build process. Although Gatsby
has a support to integrate TypeScript into these files natively, a better
approach is to use JSDoc comments to define the types for the functions and
objects:
/** * @type {import('gatsby').GatsbySSR['onRenderBody']} */ exports.onRenderBody = ({ setHtmlAttributes, setBodyProps, setBodyAttributes, }) => { setHtmlAttributes({ lang: `en` }); setBodyAttributes({ className: `bg-slate-950` }) }
More at GatsbyJS TypeScript documentation.
Second, GatsbyJS uses GraphQL to fetch data and render pages. For small
projects, you can define the query and result directly in your React code.
However, it’s redundant and not scalable for reusable components. A better
approach is to turn on the option graphqlTypegen: true in your gatsby-config
to generate types based on the GraphQL schema.
This will generate a src/gatsby-types.d.ts file that contains all the types
for your GraphQL queries on the first time you run your code. For example:
import * as React from "react"; import { graphql, useStaticQuery } from "gatsby"; const PostsTimeline: React.FC = () => { const { allMdx: { edges }, } = useStaticQuery<Queries.ArticleTimelineQuery>(query); return ( <div>...</div> ); }; export default PostsTimeline; export const query = graphql` query ArticleTimeline { allMdx( sort: { frontmatter: { created: DESC } } filter: { frontmatter: { published: { eq: true } } } ) { edges { node { id tableOfContents(maxDepth: 2) timeToRead fields { excerpt slug } } } } } `;
This feature will scan the project for GraphQL queries and generate types that
match with the query name. In this case, you first write the query
ArticleTimeline, run it first and then use the generated type in your
component.
Finally, using TypeScript in GatsbyJS requires an additional package called
gatsby-plugin-typescript to transpile the code.
However, the TypeScript compiler is not involved so many features supported by
TypeScript natively.
Conclusion#
NextJS and GatsbyJS have official guides and supports for TypeScript, from writing React code to deeply interfering with the build process. However, because GatsbyJS uses its own proprietary API files and GraphQL to fetch data, it’s more complicated to config and use TypeScript. Meanwhile, TypeScript does not require to write NextJS-specific codes and configurations; you feel like you are just writing TypeScript code with React components. For this criteria, using TypeScript in NextJS feels more natural and easier than in GatsbyJS.
UI and styling#
To fairly compare both frameworks, tailwindcss and shadcn will be used as
the main UI and styling tools. Both are popular and widely used in the React
community. While tailwindcss provides utility-first CSS class names to style
the components quickly, shadcn will provide headless UI components with
complete functionality and customization.
NextJS#
Both libraries have an official guide to integrate with NextJS. For
tailwindcss, you can follow the official guide to configure and set up your
TailwindCSS. For shadcn, you can follow the official guide to configure, install and
use their UI components in your actual project.
GatsbyJS#
Unlike NextJS, GatsbyJS does not have an official guide to install TailwindCSS,
or at least an updated one. You might need to tweak TailwindCSS’s Using
PostCSS guide. Then,
you need to install gatsby-plugin-postcss plugin for GatsbyJS to
transpile the CSS code.
A complete guide is found at this gist.
For shadcn, they have an official guide to configure, install and use their
UI components in Gatsby projects. You follow this guide to achieve so.
Conclusion#
While both libraries have official guides to integrate with NextJS, only
shadcn has an official guide to integrate with GatsbyJS. For tailwindcss,
you need to work around with PostCSS and GatsbyJS plugin system to make it work.
The amount of work is practically the same since NextJS also requires you to
set up PostCSS correctly. But, in all fairness, NextJS has a better support
for UI and styling libraries than GatsbyJS.
At the time this article is being written,
shadcnis struggling with the release oftailwindcss v4.0. If you have a similar problem, please refer to this GitHub discussion for more information.
Post rendering#
Post rendering is the process that fetches MDX posts from the file system and automatically generates pages for each post. This process is crucial for writing blogs since you don’t want to manually create a new React page for each post. Instead, you only want to write a template and let the automation handle the rest.
NextJS#
This is the controversial part of NextJS. NextJS does have an official support for generating pages from MDX files. More can be found here.
However, the official package, @next/mdx, has many limitations. For example,
it does not support frontmatter, which is crucial for writing blogs. You need to
manually parse the MDX files and extract the frontmatter, headings and content.
Using this package also requires you to follow the folder pattern that NextJS
expects, which is not flexible if you want to organize your posts in a different
way.
Another approach is to use next-mdx-remote. This package initially solves
the problem of remote MDX content. However, NextJS allows you to use Node file
system APIs to read the MDX files and parse them. This approach is more flexible
and allows you to organize your posts in any way you want.
We also use NextJS Dynamic Routes
and generateStaticParams()
to statically generate routes at build time. To strictly enforce the static
params, you can set dynamicParams=false
to return a 404 page if the route is not found in the result array of
generateStaticParams().
// Force NextJS to return 404 for unknown slugs export const dynamicParams = false; // NextJS options to enable to generate static // paths at build time. export const generateStaticParams = async () => { const posts = await fs.promises.readdir("posts"); return posts.map((post) => ({ params: { slug: post.replace(/\.mdx$/, "") }, })); // Return: ["blog-1", "blog-2", "blog-3", ...] }; export default async function BlogPost({ params }) { const { slug } = await params; const post = await getMdxBySlug(slug); return ( <div> <h1>{post.frontmatter.title}</h1> <MDXRemote source={post.body} components={{} /* JSX components to use directly*/} options={{} /* Remark and MDX plugins */} /> </div> ); }
NextJS leaves the rest to you to handle the fetching and rendering posts,
depending on how you implement functions like getMdxBySlug(). This approach
is more flexible and allows you to customize the behavior of the post rendering.
You can add more fields that are not available in the frontmatter such as
timeToRead, and tableOfContents by extending your getMdxBySlug() function.
GatsbyJS#
Unlike NextJS, GatsbyJS provides an official support for generating pages from
MDX files. GatsbyJS utilizes the Gatsby Config API, and the createPages of the Gatsby Node
API to create pages.
At the core, GatsbyJS uses the gatsby-source-filesystem plugin to read the MDX
files from the file system and the gatsby-plugin-mdx to parse the MDX files,
including the frontmatter, headings and the content. These are done by the
Gatsby Config API automatically.
Then, you can use the createPages API to generate pages for each post. For
example:
export const createPages: GatsbyNode["createPages"] = async ({ graphql, actions, reporter, }) => { const { createPage } = actions; const result = await graphql(`#graphql query MdxNode { allMdx { nodes { id frontmatter { slug } internal { contentFilePath } } } } `); if (result.errors) { reporter.panicOnBuild("Error loading MDX result", result.errors); return; } if (typeof result.data === "undefined") { reporter.panicOnBuild("No data returned from MDX query"); return; } // Create blog post pages. const posts = result.data.allMdx.nodes; const postTemplate = path.resolve(__dirname, "src", "templates", "post.tsx"); posts.forEach((post) => { createPage({ path: `/blog/${post.frontmatter.slug}`, component: `${postTemplate}?__contentFilePath=${post.internal.contentFilePath}`, context: { id: post.id, }, }) }); };
This code will generate a new page for each MDX files from the GraphQL query
result. The postTemplate is a React component that will be treated as a page
as those in src/pages directory. You can use the context object to pass
additional data to the page. For example, passing the id of the post to the
page so it can query the post content for rendering:
import React from "react"; import { MDXProvider } from "@mdx-js/react"; import { graphql } from "gatsby"; // Custom components to use directly in MDX files const shortCodes = {}; const PostLayout: React.FC<React.PropsWithChildren<Queries.PostLayoutQuery>> = ({ mdx, children }) => { return ( <div className="min-h-screen max-w-3xl mx-auto pr-4 pl-8 font-[family-name:var(--font-geist-sans)]"> <main className="flex flex-col gap-8 row-start-2 items-center sm:items-start"> <div className="w-full text-center"> <h1 className="mt-4 text-3xl">{mdx?.frontmatter?.title}</h1> </div> <div> <MDXProvider components={shortCodes}>{children}</MDXProvider>; </div> </main> </div> ); }; export default PostLayout; export const query = graphql` query PostLayout($id: String!) { mdx(id: { eq: $id }) { frontmatter { title # More information if needed such as tags, thumbnail, etc. } } } `;
GatsbyJS also provides some ways to customized your MDX files that are not
available in the frontmatter such as timeToRead. For example,
onCreateNode
API can be used to extend the node object with more fields:
// Other APIs export const onCreateNode: GatsbyNode["onCreateNode"] = ({ node, actions, reporter, }) => { const { createNodeField } = actions; if (node.internal.type === "Mdx") { try { createNodeField({ name: "timeToRead", node, value: readingTime(node.body as string), }); } catch (e) { reporter.panicOnBuild( "Error creating node field (Node ID: " + node.id + "):\n" + (e as Error).message ); } } };
Conclusion#
This is a tough one. NextJS allows you to control and handle the post rendering process as you do so in a normal TypeScript code: fetch from file system, parse the raw content, extract the frontmatter and pass the content to MDX renderer. This requires a lot of manual work, including handling installing the right packages, extracting the right parts, and defining the right types. But it will give you the flexibility to customize the behavior of the post rendering.
GatsbyJS, on the other hand, automates the process for you but it feels like you are writing GatsbyJS code, with GraphQL and its proprietary APIs. However, by having a strict convention and a set of APIs, GatsbyJS provides a more bullet-proof way to fetch and render posts. Especially with the help of the GraphiQL playground in development, you can easily test and debug your queries. GatsbyJS also infers the types for you based on the GraphQL schema, which is a huge advantage for TypeScript users.
query MdxNode { allMdx { nodes { id fields { timeToRead { minutes time } } frontmatter { slug } } } }
For this criteria, GatsbyJS is the winner.
Minimal Server-side Features#
Both frameworks are capable of handling render on demand with query strings and search params. This allows you to build features such as pagination, searching and filtering.
NextJS#
NextJS provides server-side rendering (SSR) pages with the help of Dynamic Rendering. This feature allows users to request for page information in runtime. By simply using search params in URLs, you can trigger the SSR process and render the page with the requested data.
NextJS also has a great documentation for search params and query strings.
These are built-in features for page components (page.tsx). For example:
type Props = { searchParams: Promise<{ filter?: string; sort?: string; page?: string; }>; }; export default async function Blog({ searchParams }: Props) { const { filter, page = "1", sort } = await searchParams; // ... }
By using searchParams, NextJS will automatically opt in dynamic rendering
at the request time. More information can be found here.
GatsbyJS#
Modern GatsbyJS also supports SSR. Unlike NextJS, GatsbyJS requires users to
specifically export getServerData
function to handle the SSR process. This function allows users to preprocess the
requests and pass appropriate data into page components under prop serverData.
import { GetServerData, PageProps } from "gatsby"; type ServerDataType = { filter?: string; sort?: string; page?: number; }; type Props = PageProps<Queries.BlogPageQuery, object, unknown, ServerDataType>; function Blog(props: Props) { const { serverData } = props; const { filter, page, sort } = serverData; // ... } export const getServerData: GetServerData<ServerDataType> = async (context) => { const { query } = context; const { filter, page = "1", sort } = query; // ... return { status: 200, // The HTTP status code that should be returned props: { filter, sort, page, }, // Will be passed to the page component as "serverData" prop headers: {}, // HTTP response headers for this page }; }; export default Blog;
However, the workflow is more complicated than expected when you try incorporating GraphQL. Gatsby uses GraphQL to fetch data at build time, whether your pages are rendered statically or on server-side. GatsbyJS does not support runtime GraphQL queries yet 3.
This means you will need to handle the search params in getServerData and the requested blog data in the page components.
import { GetServerData, PageProps, graphql } from "gatsby"; function Blog(props: Props) { const { data, serverData } = props; const { filter, page, sort } = serverData; // ... } export const query = graphql` query BlogPage { allMdx { nodes fields { timeToRead { text time } } frontmatter { slug title date author description tags category published publishedAt } } } } `;
The GraphQL result will be passed to the page components under prop data. You can combine data and serverData to handle the rendering logic such as
paginating, sorting and filtering your posts.
Conclusion#
Both frameworks provide a way to handle server-side rendering with basic runtime
requests. However, NextJS has a more straightforward approach to handle search
params and query strings. You can simply use the searchParams prop in your
React component without any boilerplate. GatsbyJS, on the other hand, requires
you to export a specific function to handle the SSR process. The process is also
more complicated when you try to incorporate GraphQL. For this criteria,
NextJS slightly wins over GatsbyJS.
SEO#
SEO is a crucial part of building a blog. It helps your blog be easier to be indexed by search engines and be more accessible to readers. Both frameworks provide a way to handle SEO with metadata and sitemap.
NextJS#
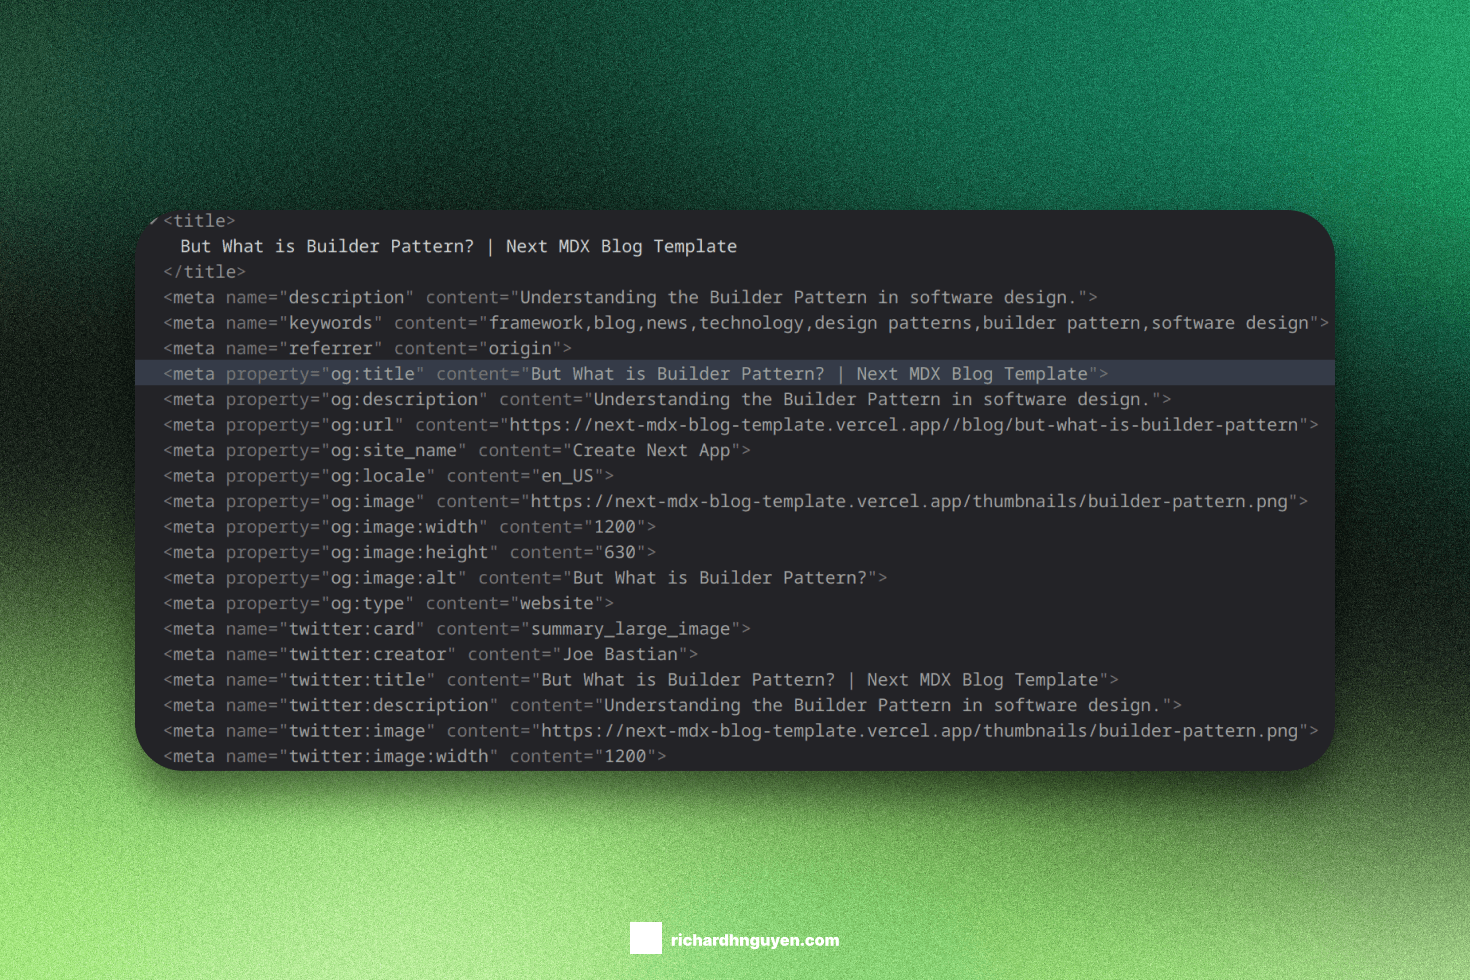
NextJS provides a way to handle SEO with the help of exported metadata
object. This object allows you to define the metadata for your pages, such as
opengraph and twitter cards, and NextJS will transform it into the appropriate HTML <meta> tags:
import { type Metadata } from "next"; export const metadata: Metadata = { title: "Home | Next MDX Blog Template", description: "A blog template built with Next.js and MDX.", referrer: "origin", keywords: [ "framework", "blog", "news", "technology", ], metadataBase: new URL( process.env.NODE_ENV === "production" ? "https://mydomain.com" : "http://localhost:8080" ), openGraph: { type: "website", description: "Generated by create next app", title: "Home | Create Next App", siteName: "Create Next App", url: "https://nextjs.org", locale: "en_US", images: [ { url: "/twitter-card.png", width: 1200, height: 630, alt: "Create Next App", }, ], }, twitter: { card: "summary_large_image", title: "Home | Create Next App", description: "Generated by create next app", images: [{ url: "/twitter-card.png", width: 1200, height: 630, alt: "Create Next App", }], } }; export function Page(props) { return ( <div>...</div> ); }
This metadata object provides basic needs for your site metadata and SEO
needs. With the help of TypeScript and good documentation, you can easily infer
the types and customize the metadata for your pages. NextJS will use these
metadata fields to construct the appropriate HTML <meta> tags during runtime.
NextJS also allows you to generate metadata dynamically with
generateMetadata().
This function uses the same props as your page components, params and
searchParams. This allows you to generate metadata based on the requested
data.
import type { Metadata } from 'next' // either Static metadata export const metadata: Metadata = { title: '...', } // or Dynamic metadata export async function generateMetadata({ params }) { return { title: '...', } }
GatsbyJS#
GatsbyJS uses a different approach to handle SEO. Instead of using a single metadata object, GatsbyJS uses a combination of configurations and components to handle SEO.
At the core, Gatsby provides the <Head> API to
add elements to the <head> of your HTML document, which is useful to add
<meta> tags for SEO.
import * as React from "react"; const Page = () => <div>Hello World</div>; export default Page; export function Head() { return ( <title>Hello World</title> ); }
Since <Head> is a normal React component, you can write a reusable component
to handle common metadata for all pages and specific metadata for each page.
import React from "react"; import { useSiteMetadata } from "@/hooks/use-site-metadata"; type Props = Partial< NonNullable<Queries.SiteMetadataQuery["site"]>["siteMetadata"] > & { children?: React.ReactNode | React.ReactNode[]; keywords?: string[] }; const SEO: React.FC<Props> = ({ title, description, image, siteUrl, xUsername, children, keywords = ["blog", "gatsby", "mdx", "typescript"], }) => { const siteMetadata = useSiteMetadata(); const { titleTemplate, title: defaultTitle, description: defaultDescription, image: defaultImage, siteUrl: defaultSiteUrl, xUsername: defaultXUsername, } = siteMetadata || {}; const seo = { title: title || defaultTitle, description: description || defaultDescription, siteUrl: `${siteUrl || defaultSiteUrl}`, xUsername: xUsername || defaultXUsername, image: { src: image?.src || defaultImage?.src, width: image?.width || defaultImage?.width, height: image?.height || defaultImage?.height, alt: image?.alt || defaultImage?.alt, } }; return ( <> <title key={`${seo.title}`}>{`${seo.title} | ${titleTemplate}`}</title> <meta name="description" content={description} /> <meta name="image" content={`${seo.siteUrl}${seo.image.src}`} /> <meta name="keywords" content={keywords.join(",")} /> <meta name="twitter:card" content="summary_large_image" /> <meta name="twitter:creator" content={seo.xUsername} /> <meta name="twitter:title" content={seo.title} /> <meta name="twitter:description" content={seo.description} /> <meta name="twitter:image" content={`${seo.image.src}`} /> <meta property="og:type" content="website" /> <meta property="og:title" content={seo.title} /> <meta property="og:description" content={seo.description} /> <meta property="og:site_name" content={seo.title} /> <meta property="og:url" content={seo.siteUrl} /> <meta property="og:image" content={`${seo.image.src}`} /> {/* More metadata tags */} {/* Specific SEO tags such as JSON+LD */} {children} </> ); }; export default SEO;
GatsbyJS also recommends defining siteMetadata in your gatsby-config
file. This field acts as a global, reusable configuration for your site, but
mainly used for SEO purposes:
import type { GatsbyConfig } from "gatsby"; const config: GatsbyConfig = { siteMetadata: { title: `Home`, titleTemplate: `Gatsby MDX Blog Starter`, siteUrl: `https://gatsby-mdx-blog-starter.netlify.app/`, description: `A Gatsby blog template using MDX`, xUsername: `@RichardNgu65749`, image: { src: `/og-image.png`, width: 1600, height: 836, alt: `OG Gatsby MDX Blog Starter Image`, } }, plugins: [ // ... ], }
Then, you can define a custom hook to access the siteMetadata in your
your SEO component:
import { graphql, useStaticQuery } from "gatsby"; export const useSiteMetadata = () => { const data = useStaticQuery<Queries.SiteMetadataQuery>(graphql` query SiteMetadata { site { siteMetadata { title titleTemplate description xUsername siteUrl image { src width height alt } } } } `) return data.site?.siteMetadata; }
Similar to NextJS, GatsbyJS also allows you to generate add metadata tags
dynamically based on the requested data. For example, you can expose the GraphQL
result to the <Head> component and use that to generate the metadata tags:
// Template to generate blog post pages in gatsby-node.ts // See post-rendering section for more information import React from "react"; import { MDXProvider } from "@mdx-js/react"; import { graphql, HeadFC } from "gatsby"; import SEO from "@/components/seo"; type PostLayoutData = { data: Queries.PostLayoutQuery; }; const PostLayout: React.FC<React.PropsWithChildren<PostLayoutData>> = ({ data, children, }) => { return ( <div className="min-h-screen max-w-3xl mx-auto pr-4 pl-8 font-[family-name:var(--font-geist-sans)]"> {/* ... */} </div> ); }; export default PostLayout; export const query = graphql` query PostLayout($id: String!) { mdx(id: { eq: $id }) { fields { timeToRead { minutes time text } } frontmatter { # Other fields } } } `; export const Head: HeadFC<Queries.PostLayoutQuery> = ({ data }) => { // From GraphQL result const { mdx } = data; return <SEO key={`${mdx?.frontmatter?.slug}`} title={`${mdx?.frontmatter?.title}`} description={`${mdx?.frontmatter?.description}`} keywords={mdx?.frontmatter?.tags as string[]} > <script type="application/ld+json"> { ` { "@context": "https://schema.org", "@type": "NewsArticle", "headline": "${mdx?.frontmatter?.title}", "image": [ "${mdx?.frontmatter?.thumbnail?.childImageSharp?.gatsbyImageData.images.fallback?.src}" ], "datePublished": "${new Date(mdx?.frontmatter?.publishedAt || 0).toISOString()}", "dateModified": "${new Date(mdx?.frontmatter?.date || 0).toISOString()}", "author": ${JSON.stringify([{ "@type": "Person", "name": mdx?.frontmatter?.author, "url": "https://x.com/RichardNgu65749" }])} } ` } </script> </SEO> };
Conclusion#
Both frameworks are initially designed to solve the SEO problems existing in normal React applications. These methods are native and official supported from the frameworks with great documentation.
However, NextJS has a more easy way to handle SEO metadata. It’s simply that
NextJS provides a well-structured, type-safe metadata object that tells you
exactly how you can use each field. GatsbyJS does not provide a good
documentation on what fields, or how you should use it. If you want to enforce
type safety, you need to involve gatsby-node to explicitly define the types
for it.
For those reasons, NextJS is the winner.
Third-party integration#
Third-party solutions are crucial for building a blog. They provide additional features such as analytics, image hosting and searching. Both frameworks have a list of official and community plugins to integrate with third-party tools.
Since we are building a blog, we will focus on those features that are mentioned above: analytics, image hosting and searching.
For analytics, Google Analytics will help us track the page views, user interactions and other metrics. For image hosting, Cloudinary is a popular choice for hosting images and optimize delivery via programmatic configurations. For searching, we are going to use Algolia to index and search our posts.
Analytics#
Google Analytics is a popular, free choice to monitor website traffic and user behavior. Although setting up Google Analytics is fairly easy in React projects, both frameworks have their own official plugins to integrate with Google Analytics without a hassle. This will eliminate the need to manually configure the tracking code and reduce the risk of errors.
NextJS#
NextJS provides @next/third-parties/google
to integrate with Google Analytics. This package provides a set of components
and hooks to integrate with Google SDK, including Google Analytics. To use it, simply import the <GoogleTagManager> component and wrap your application with it:
import { GoogleTagManager } from "@next/third-parties/google" export default function RootLayout({ children, }: { children: React.ReactNode }) { return ( <html lang="en"> <GoogleTagManager gtmId="GTM-XYZ" /> <body>{children}</body> </html> ) }
GatsbyJS#
gatsby-plugin-google-gtag
is the official plugin from Gatsby to integrate with Google Analytics. Unlike
@next/third-parties/google which uses a React component, you need to put
the plugin in your gatsby-config file and pass the configuration options to
it.
const config: GatsbyConfig = { plugins: [ { resolve: `gatsby-plugin-google-gtag`, options: { trackingIds: [ `G-RW65TSLLP4`, ], pluginConfig: { head: true, }, }, }, // ... ], };
Image hosting#
For image hosting, I decided to go with Cloudinary. Cloudinary is a popular choice for hosting images and video because it provides a programmatic way to upload, transform and deliver images. It also supports a variety of languages and frameworks, including React.
NextJS#
Cloudinary has an official package, next-cloudinary
just for NextJS. The package lets you set up Cloudinary environment variables
and use the React component immediately.
NEXT_PUBLIC_CLOUDINARY_CLOUD_NAME="<Your Cloud Name>" NEXT_PUBLIC_CLOUDINARY_API_KEY="<Your API Key>" CLOUDINARY_API_SECRET="<Your API Secret>"
import { CldImage } from 'next-cloudinary'; <CldImage width="960" height="600" src="<Public ID>" sizes="100vw" alt="Description of my image" />
GatsbyJS#
GatsbyJS does provide community plugins to integrate with Cloudinary.
gatsby-source-cloudinary
allows you to add your Cloudinary resources into Gatsby’s GraphQL data layer.
Then, you can use gatsby-transformer-cloudinary
to transform the Cloudinary resources into Gatsby’s image format. This allows
you to use the <GatsbyImage> component to render the images.
module.exports = { plugins: [ { resolve: `gatsby-source-cloudinary`, options: { cloudName: process.env.CLOUDINARY_CLOUD_NAME, apiKey: process.env.CLOUDINARY_API_KEY, apiSecret: process.env.CLOUDINARY_API_SECRET, // resourceType: `image`, // type: `twitter`, // maxResults: 22, // tags: true, // context: true, // prefix: `demo/animals` }, }, { resolve: `gatsby-transformer-cloudinary`, options: { // Add the `gatsbyImageData` resolver to `CloudinaryMedia` transformTypes: [`CloudinaryMedia`], }, }, `gatsby-plugin-image`, ], };
However, the setup and configuration is not as straightforward. You will need To create a GraphQL type or configure an existing one in order for the plugin to recognize the resources and transform accordingly. An easy way is to use their React package:
import React from "react"; import { Cloudinary } from "@cloudinary/url-gen"; import { AdvancedImage } from "@cloudinary/react"; import { auto } from "@cloudinary/url-gen/actions/resize"; import { autoGravity } from "@cloudinary/url-gen/qualifiers/gravity"; import { cn } from "@/lib/utils"; type Props = { src: string; alt: string; className?: string; }; const ImageCard: React.FC<Props> = ({ src, alt, className }) => { const cld = new Cloudinary({ cloud: { cloudName: process.env.GATSBY_CLOUDINARY_CLOUD_NAME, }, }); const img = cld .image(src) .format("auto") .quality("auto") .resize(auto().gravity(autoGravity())); return ( <div className={ cn("[&>img]:object-cover [&>img]:w-full [&>img]:h-40", className) } > <AdvancedImage cldImg={img} alt={alt} /> </div> ); };
Searching#
Searching, or indexing, or autocomplete, is a crucial part of building a blog. It helps our readers to easily search and find the posts they are looking for in a fast, accurate way.
Algolia is considered the best choice for indexing technical content. You can
upload your content to Algolia using their write APIs. Algolia provides
from a complete UI tools, react-instantsearch,
a mix-match between UI and logic, autocomplete,
to a fully-customizable React renderer, autocomplete-core
so you can build your search features however you want. In this criterion, we
care about how easy to upload the content to Algolia and to use the indices.
Algolia also has a free plan for open-source, non-commercial projects such as technical writings and documentations, docsearch. Algolia team will take a look at your project and provide snippets on how to integrate the free plan into your website.
NextJS#
For uploading the content to Algolia, unfortunately, you need to write your own standalone script to do so. An upside is that you can use NodeJS and control the process on your own. However, this requires you to manually configure, and upload the content to Algolia.
import { algoliasearch } from "algoliasearch"; const client = algoliasearch( process.env.ALGOLIA_APP_ID as string, process.env.ALGOLIA_ADMIN_API_KEY as string ); const processRecords = async () => { const posts = await getMdxPosts() const postIndices = await Promise.all( posts.map(async (file) => { const { frontmatter, headings } = await getMdxBySlug(file); return { objectID: file.replace(".mdx", ""), title: frontmatter.data.title, description: frontmatter.data.description, // other attributes for searching }; }) ); return await client.saveObjects({ indexName: process.env.ALGOLIA_INDEX_NAME as string, objects: posts, }); }; processRecords() .then(() => { console.log("Successfully indexed records"); }) .catch((err) => { console.error(err); });
After successfully uploading the indexing data to Algolia, you can use Algolia’s searching UI packages to integrate with your website.
react-instantsearch provides a complete UI out-of-the-box solution with many
widgets to choose from. They also provide hooks for each UI widgets so that you
can write your own components.
react-instantsearchprovides a package,react-instantsearch-nextjs, that exclusively supports NextJS an React Server Components. This package enables SSR to generate HTML fromreact-instantsearchcomponents on the server.
autocomplete-js provides a pre-defined UI logic such as functionalities,
accessibility and keyboard navigation. However, you are in control of writing
your own UI components and integrating them with autocomplete-js props.
Finally, autocomplete-core lets you define your own logic on how Algolia
should return the results. From writing queries, defining the result objects to
customizing collections such as recent and favorite results.
GatsbyJS#
GatsbyJS provides a good documentation on how to integrate with Algolia. It also
includes gatsby-plugin-algolia to help you upload the
indexing data to Algolia. The beauty of this plugin is that it automatically
send the data to Algolia when you run gatsby build command, even in local
environment. With the help of Gatsby Cache, it will only upload the data that
has been changed the last build.
const pageQuery = `#graphql query AlgoliaQuery { pages: allMdx { nodes { id internal { contentDigest } tableOfContents(maxDepth: 3) frontmatter { slug title description tags publishedAt thumbnail { cloudName alt publicId } } } } }`; function pageToAlgoliaRecord(props) { return { objectID: props.frontmatter.slug, title: props.frontmatter.title, description: props.frontmatter.description, // other attributes for searching }; } const queries = [ { query: pageQuery, transformer: ({ data }: { data: Data }) => data.pages.nodes.map(pageToAlgoliaRecord), indexName: process.env.GATSBY_ALGOLIA_INDEX_NAME as string, }, ]; const config: GatsbyConfig = { plugins: [ { resolve: `gatsby-plugin-algolia`, options: { appId: process.env.GATSBY_ALGOLIA_APP_ID, apiKey: process.env.ALGOLIA_WRITE_KEY, queries, settings: { // optional, any index settings // Note: by supplying settings, you will // overwrite all existing settings on the index }, }, }, // ... ], }; export default config;
After successfully uploading the indexing data to Algolia, you can use Algolia’s searching UI packages to integrate with your website as mentioned above.
Conclusion#
Both frameworks provide a way to integrate with third-party services such as Google Analytics, Cloudinary and Algolia. However, NextJS has a more straightforward approach to integrate with Google Analytics and Cloudinary.
Integration with Algolia is an interesting one. NextJS does not have an automatic process to upload the indexing data to Algolia. Meanwhile, the configuration and setup in GatsbyJS is more complicated due to GraphQL queries.
However, I’m still inclined to say that NextJS is the winner here. An important part of integrating with third-party plugins is how well the docs are. Finding documentation in NextJS is fairly easy because the docs are well supported in many cases andd well maintained to resolve many issues. I cannot say the same thing to GatsbyJS. The documentation is either lacking or outdated. Searching for solutions in GatsbyJS is also painful since there are not many active community members to help you out.
Customization#
Customization is how easy you can customize the framework to fit your needs. This is a broad and subjective aspect because you might customize your app based on your needs. However, I focus on the most commonly implemented feature in a blog: dark mode.
To keep the comparison fair, I won’t use any third-party libraries or packages to implement the dark mode. Instead, I will write my own implementation to demonstrate how easy it is to customize the frameworks.
There are three main parts to implement dark mode:
- Detect and persist the user’s preference with
localStorageAPI. - Have a theme switch to toggle between light and dark mode.
- Prevent the flash of unstyled content (FOUC) when the page is loading.
NextJS#
To be compatible with TailwindCSS, which uses HTML classes to toggle the light
and dark theme, we need to add a custom client script that retrieves the user’s
preference from localStorage and applies the theme to the HTML element.
void function () { /** * Callback fired when window.__theme was set or updated */ window.__onThemeChange = function () {}; /** * Sets the theme on the <body> element * @param {string} newTheme - The new theme to set */ let preferredTheme; try { preferredTheme = localStorage.getItem("theme"); } catch (err) { } function setTheme(newTheme) { const oldTheme = window.__theme; const darkOrLight = newTheme === "system" ? ( window.matchMedia("(prefers-color-scheme: dark)").matches ? "dark" : "light" ) : newTheme; if (preferredTheme && document.documentElement.classList.contains(preferredTheme) && preferredTheme !== darkOrLight) { document .documentElement .classList .replace(preferredTheme, darkOrLight); } else { document.documentElement.classList.add(darkOrLight); } window.__theme = newTheme; preferredTheme = darkOrLight; window.__onThemeChange(darkOrLight); } window.__setPreferredTheme = function (newTheme) { setTheme(newTheme); try { localStorage.setItem("theme", newTheme); } catch (err) {} } var darkQuery = window.matchMedia("(prefers-color-scheme: dark)"); darkQuery.addListener(function (e) { window.__setPreferredTheme(e.matches ? "dark" : "light"); }); setTheme(preferredTheme || (darkQuery.matches ? "dark" : "light")) }();
The purpose of the script is to detect the user’s preference and apply the theme to the HTML element. It’s also suggested to include the script at the top of the page to reduce potential flash of unstyled content (FOUC).
import type { Metadata } from "next"; const script = /*js*/ ` // The script above `; export default function RootLayout({ children, }: Readonly<{ children: React.ReactNode; }>) { return ( <html lang="en" suppressHydrationWarning> <body> <script suppressHydrationWarning dangerouslySetInnerHTML={{ __html: script, }} ></script> <Header /> {children} <Footer /> </body> </html> ); }
Finally, we need a theme switcher to toggle between light and dark mode. This can be done in a React component that interacts with the script above.
"use client"; import React, { type JSX } from "react"; import { LucideMonitor, MoonIcon } from "lucide-react"; import { SunIcon } from "@primer/octicons-react"; import { Button } from "@/components/ui/button"; import { DropdownMenu, DropdownMenuContent, DropdownMenuRadioGroup, DropdownMenuRadioItem, DropdownMenuTrigger, } from "@/components/ui/dropdown-menu"; import { cn } from "@/lib/utils"; declare global { interface Window { __theme: string; __onThemeChange: (theme: string) => void; __setPreferredTheme: (theme: string) => void; } } function ThemeSwitcher(): JSX.Element { const [mounted, setMounted] = React.useState(false); const [theme, setTheme] = React.useState("system"); const handleThemeChange = React.useCallback((newTheme: string) => { window.__setPreferredTheme(newTheme); }, []); React.useEffect(() => { window.__onThemeChange = function () { setTheme(window.__theme); }; // Fix hydration error setTheme(window.__theme); setMounted(true); }, []); if (!mounted) { return ( <div className="w-9 h-9 rounded-md animate-pulse dark:bg-slate-800" /> ); } return ( <DropdownMenu> <DropdownMenuTrigger asChild> <Button variant="ghost" size="icon" className={cn( "cursor-pointer", "dark:text-slate-200", "dark:hover:bg-sky-900" )} suppressHydrationWarning > {theme === "dark" ? ( <MoonIcon className="h-4 w-4" /> ) : theme === "light" ? ( <SunIcon className="h-4 w-4" /> ) : ( <LucideMonitor className="h-4 w-4" /> )} </Button> </DropdownMenuTrigger> <DropdownMenuContent className="w-56"> <DropdownMenuRadioGroup value={theme ?? "system"} onValueChange={handleThemeChange} > <DropdownMenuRadioItem value="system">System</DropdownMenuRadioItem> <DropdownMenuRadioItem value="light">Light</DropdownMenuRadioItem> <DropdownMenuRadioItem value="dark">Dark</DropdownMenuRadioItem> </DropdownMenuRadioGroup> </DropdownMenuContent> </DropdownMenu> ); } export default ThemeSwitcher;
GatsbyJS#
GatsbyJS has a similar approach to duo theme feature as NextJS. First, we need
to figure out how to insert the script. Unlike NextJS, which allows you to
directly add inline scripts in app layout, GatsbyJS requires you to use the
gatsby-ssr to specifically interact with the <head> and <body> elements.
import React from "react"; import { type GatsbySSR } from "gatsby"; // Other APIs from GatsbySSR export const onRenderBody: GatsbySSR["onRenderBody"] = ({ setHtmlAttributes, setPreBodyComponents, }) => { setHtmlAttributes({ lang: "en", suppressHydrationWarning: true, }); setPreBodyComponents([ <script key="theme-script" dangerouslySetInnerHTML={{ __html: /*js*/ ` // The script above `, }} />, ]); };
Then, we need to create a React component to interact with the script to handle the theme switching. The code is practically the same as the NextJS version since both are using the same methods from the script.
Other customizations#
Other customizations are where things get polarized. Let’s take another example where you want to control which MDX pages are generated in production.
Typically, the structure of MDX posts has a frontmatter field called published
to indicate whether the post is ready to be published or not. I mean, you
neither want to publish a draft nor commit a 1000-line post in a single commit.
You want to commit the post in small chunks just like you do with your code.
In NextJS, with the help of generateStaticParams, you can filter the posts
based on the published field and generate only the slugs for the
ready-to-be-published posts. In GatsbyJS, you must use the createPages method
from Gatsby Node API to filter the posts based on the published field and
generate the pages.
The tricky part is that NextJS allows you to use NodeJS File System API to read
the MDX files directly. After reading, you can use other libraries such as
gray-matter to retrieve the fields, just like any text files. However,
GatsbyJS requires you to do that via GraphQL queries. This means that you need
to write a GraphQL query to filter the posts based on the published field.
export const createPages: GatsbyNode["createPages"] = async ({ graphql, actions, reporter, }) => { const { createPage } = actions; const result = await graphql(` #graphql query MdxNode { allMdx { nodes { id frontmatter { slug published } internal { contentFilePath } } } } `); // Create blog post pages. const posts = result.data.allMdx.nodes; const postTemplate = path.resolve(__dirname, "src", "templates", "post.tsx"); posts.forEach((post) => { if (!post.frontmatter.published) { return; } createPage({ path: `/blog/${post.frontmatter.slug}`, component: `${postTemplate}?__contentFilePath=${post.internal.contentFilePath}`, context: { id: post.id, }, }); }); };
Conclusion#
Both frameworks provide ways to customize your blog with many features. This is a subjective aspect because it really depends how deep you want to intervene with the frameworks to customize your app. To be fair, both frameworks will provide you the tools to tweak your app thoroughly.
However, I prefer the NextJS approach. By directly interacting with the NodeJS APIs with few NextJS APIs, you can easily get the job done. GatsbyJS, on the other hand, requires you to use GraphQL and proprietary APIs to achieve the same result. Therefore, NextJS is the winner.
Hosting#
To fairly compare the hosting services, I will use the official hosting services behind the frameworks: Vercel for NextJS and Netlify for GatsbyJS. And I will be using the free tier for both services.
A major advantage of NextJS is the hosting service behind the framework, Vercel. NextJS is well supported by Vercel, which provides a seamless deployment. You can deploy static sites, serverless functions for SSR and API routes very easily. There is almost no problem with the deployment process from Vercel.
Meanwhile, Netlify, the hosting service behind GatsbyJS, has some problems with the deployment process of Gatsby. The major problem is that Gatsby Image Plugin on server-side rendering, and deferred static generation does not work in Netlify 4.
The Gatsby app demo in this blog is deployed to Vercel. Although it works fine, the serverless function for SSR routes is extremely slow, compared to the ones written in NextJS. However, it’s still better than not deployed at all.
Final words#
My first-ever written React app was actually a Gatsby app for my portfolio site. Back then, GatsbyJS was the pioneer in bringing React to the server side and static site generators.
However, due to lack of active community and less frequent updates, GatsbyJS is becoming less popular compared to other frameworks. The major thing you will see in GatsbyJS during development is that it’s lacking in documentation and active community support. Documentation is either outdated or not well-maintained.
NextJS, on the other hand, provides a more detailed documentation and has an active community support. The framework is also more flexible since you can search for solutions in regular React or NodeJS problems, whereas Gatsby has its own proprietary APIs.
Many major developers who had their blog written in GatsbyJS are now moving to either NextJS or Astro. So if you are planning a blog, I would strongly recommend NextJS over GatsbyJS.
You can also visit the demo apps for both frameworks here: